“An ounce of prevention is worth a pound of cure” goes the old saying, reminding us that it’s easier to stop something from happening in the first place than to repair the damage after it has happened.
In the era of artificial intelligence (AI), this proverb underscores the importance of avoiding potential pitfalls, such as overfitting, through techniques like regularization.
In this article, we will discover regularization by starting with its fundamental principles to its application using Sci-kit Learn(Machine Learning) and Tensorflow(Deep Learning) and witness its transformative power with real-world datasets by comparing these results. Let’s start!
Regularization is a critical concept in machine learning and deep learning that aims to prevent models from overfitting.
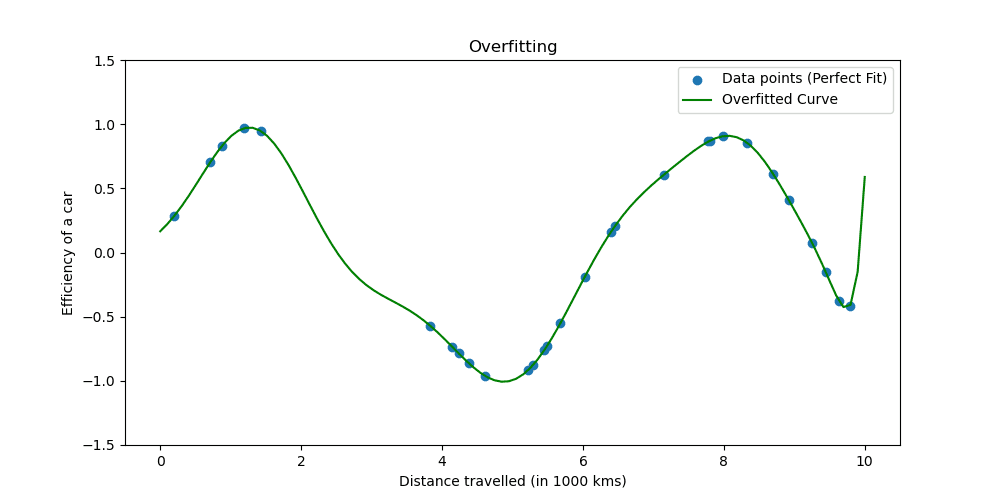
Overfitting happens when a model learns the training data too well. The situation shows your model is too good to be true.
Let’s see what overfitting looks like.
Regularization techniques adjust the learning process to simplify the model, ensuring it performs well on training data and generalizes well to new data. We will explore two well-known ways of doing this.
In machine learning, regularization is often applied to linear models, such as linear and logistic regression. In this context, the most common forms of regularization are:
- L1 regularization (Lasso regression)
- L2 regularization (Ridge regression)
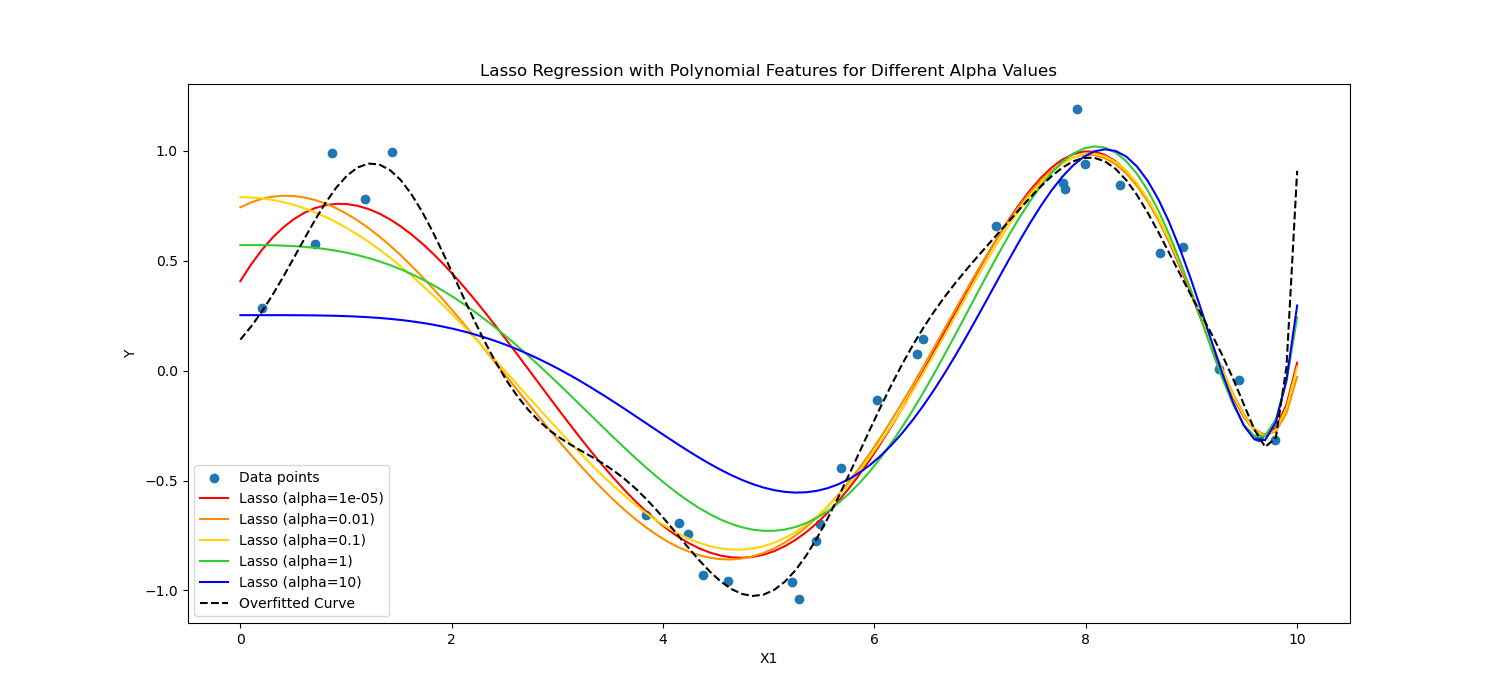
Lasso Regularization encourages the model to use only the most essential features by allowing some coefficient values to be exactly zero, which can be particularly useful for feature selection.
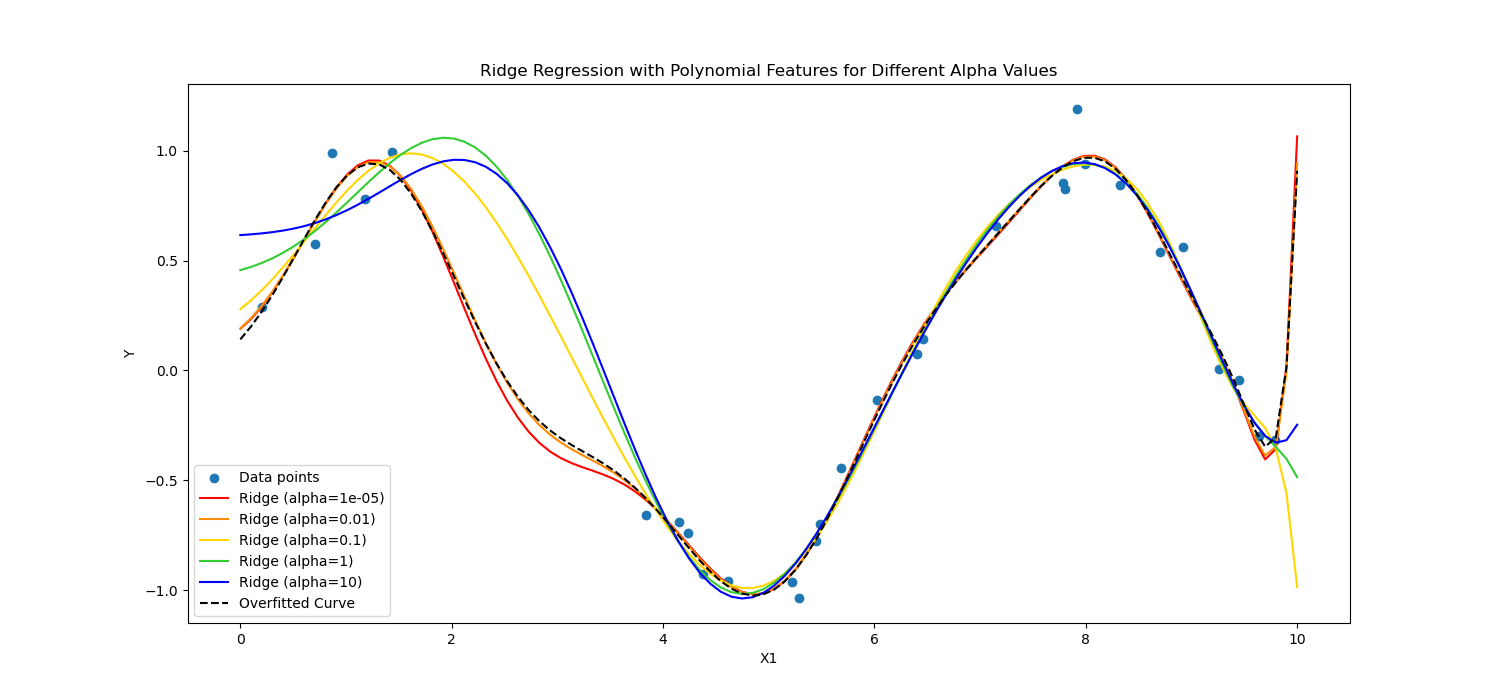
On the other hand, Ridge regularization discourages significant coefficients by penalizing the square of their values.
In short, they calculated differently.
Let’s apply these to the cardiac patient data to see its power In deep learning and machine learning.
Now, we will apply regularization to analyze cardiac patient data to see the power of regularization. You can reach the dataset from here.
To apply machine learning, we will use Scikit-learn; to apply deep learning, we will use TensorFlow. Let’s start!
Regularization in Machine Learning
Scikit-learn is one of the most popular Python libraries for machine learning that provides simple and efficient data analysis and modeling tools.
It includes implementations of various regularization techniques, particularly for linear models.
Here, we’ll explore how to apply L1 (Lasso) and L2 (Ridge) regularization.
In the following code, we will train logistic regression using Ridge(L2) and Lasso regularization (L1) techniques. At the end, we will see the detailed report. Let’s see the code.
from sklearn.model_selection import train_test_split
from sklearn.preprocessing import StandardScaler
from sklearn.linear_model import LogisticRegression
from sklearn.metrics import accuracy_score, classification_report

# Assuming heart_data is already loaded
X = heart_data.drop('target', axis=1)
y = heart_data['target']

# Split the data into training and testing sets
X_train, X_test, y_train, y_test = train_test_split(X, y, test_size=0.2, random_state=42)

# Standardize the features
scaler = StandardScaler()
X_train_scaled = scaler.fit_transform(X_train)
X_test_scaled = scaler.transform(X_test)

# Define regularization values to explore
regularization_values = [0.001, 0.01, 0.1]

# Placeholder for storing performance metrics
performance_metrics = []

# Iterate over regularization values for L1 and L2
for C_value in regularization_values:
    # Train and evaluate L1 model
    log_reg_l1 = LogisticRegression(penalty='l1', C=C_value, solver="liblinear")
    log_reg_l1.fit(X_train_scaled, y_train)
    y_pred_l1 = log_reg_l1.predict(X_test_scaled)
    accuracy_l1 = accuracy_score(y_test, y_pred_l1)
    report_l1 = classification_report(y_test, y_pred_l1)
    performance_metrics.append(('L1', C_value, accuracy_l1))

    # Train and evaluate L2 model
    log_reg_l2 = LogisticRegression(penalty='l2', C=C_value, solver="liblinear")
    log_reg_l2.fit(X_train_scaled, y_train)
    y_pred_l2 = log_reg_l2.predict(X_test_scaled)
    accuracy_l2 = accuracy_score(y_test, y_pred_l2)
    report_l2 = classification_report(y_test, y_pred_l2)
    performance_metrics.append(('L2', C_value, accuracy_l2))

# Print the performance metrics for all models
print("Model Performance Evaluation:")
print("--------------------------------")
for metric in performance_metrics:
    reg_type, C_value, accuracy = metric
    print(f"Regularization: {reg_type}, C: {C_value}, Accuracy: {accuracy:.2f}")
Here is the output.
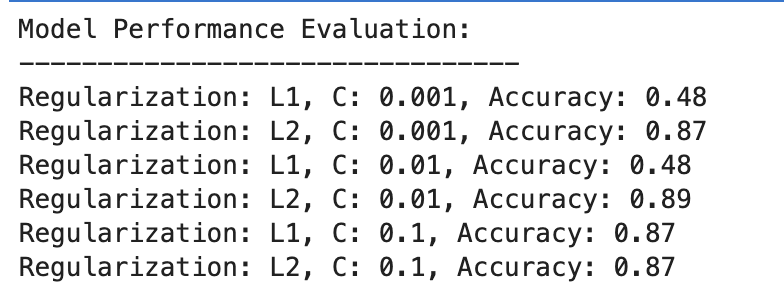
Let’s evaluate the result.
L1 Regularization
- At C=0.001, accuracy is notably low (48%). This shows that the model is underfitting. It shows too much regularization.
- As C increases to 0.01, accuracy remains unchanged for L1, suggesting that the model still suffers from underfitting or the regularization is too strong.
- At C=0.1, accuracy improves significantly to 87%, showing that reducing the regularization strength allows the model to learn better from the data.
L2 Regularization
Across the board, L2 regularization performs consistently well, with accuracy at 87% for C=0.001 and slightly higher at 89% for C=0.01, then stabilizing at 87% for C=0.1.
This suggests that L2 regularization is generally more forgiving and effective for this dataset in logistic regression models, potentially due to its nature.
Regularization in Deep Learning
Several regularization techniques are used in deep learning, including L1 (Lasso) and L2 (Ridge) regularization, dropout, and early stopping.
In this one, to repeat what we did in the machine learning example before, we will apply L1 and L2 regularization. Let’s define a list of L1 and L2 regularization values this time.
Then, for all of these values, we will train and evaluate our deep learning model, and at the end, we will assess the results.
Let’s see the code.
from tensorflow.keras.regularizers import l1_l2
import numpy as np

# Define a list/grid of L1 and L2 regularization values
l1_values = [0.001, 0.01, 0.1]
l2_values = [0.001, 0.01, 0.1]

# Placeholder for storing performance metrics
performance_metrics = []

# Iterate over all combinations of L1 and L2 values
for l1_val in l1_values:
    for l2_val in l2_values:
        # Define model with the current combination of L1 and L2
        model = Sequential([
            Dense(128, activation='relu', input_shape=(X_train_scaled.shape[1],), kernel_regularizer=l1_l2(l1=l1_val, l2=l2_val)),
            Dropout(0.5),
            Dense(64, activation='relu', kernel_regularizer=l1_l2(l1=l1_val, l2=l2_val)),
            Dropout(0.5),
            Dense(1, activation='sigmoid')
        ])

        model.compile(optimizer="adam", loss="binary_crossentropy", metrics=['accuracy'])

        # Train the model
        history = model.fit(X_train_scaled, y_train, validation_split=0.2, epochs=100, batch_size=10, verbose=0)

        # Evaluate the model
        loss, accuracy = model.evaluate(X_test_scaled, y_test, verbose=0)

        # Store the performance along with the regularization values
        performance_metrics.append((l1_val, l2_val, accuracy))

# Find the best performing model
best_performance = max(performance_metrics, key=lambda x: x[2])
best_l1, best_l2, best_accuracy = best_performance

# After the loop, to print all performance metrics
print("All Model Performances:")
print("L1 Value | L2 Value | Accuracy")
for metrics in performance_metrics:
    print(f"{metrics[0]:<8} | {metrics[1]:<8} | {metrics[2]:.3f}")

# After finding the best performance, to print the best model details
print("\nBest Model Performance:")
print("----------------------------")
print(f"Best L1 value: {best_l1}")
print(f"Best L2 value: {best_l2}")
print(f"Best accuracy: {best_accuracy:.3f}")
Here is the output.
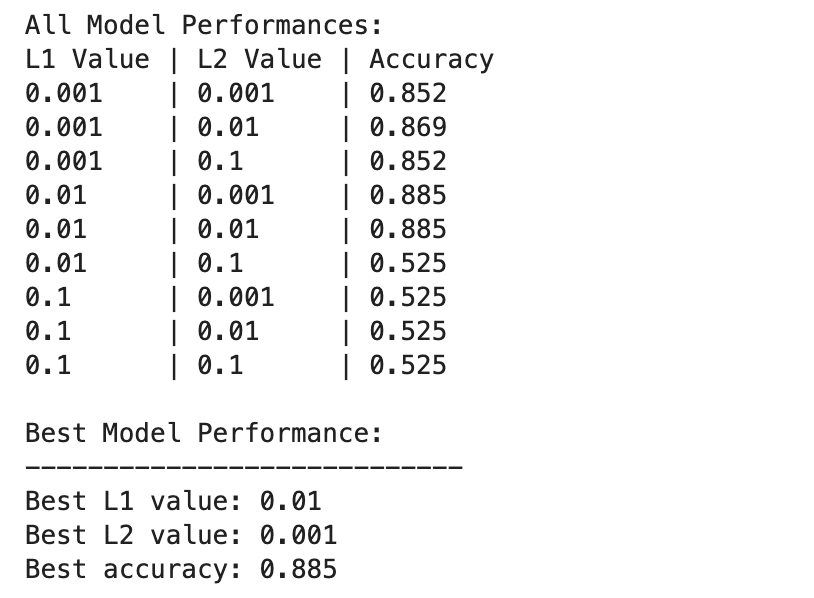
The deep learning model performances vary more widely across different combinations of L1 and L2 regularization values.
The best performance is observed at L1=0.01 and L2=0.001, with an accuracy of 88.5%, which indicates a balanced regularization that prevents overfitting while allowing the model to capture the underlying patterns in the data.
Higher regularization values, especially at L1=0.1 or L2=0.1, drastically reduce model accuracy to 52.5%, suggesting that too much regularization severely limits the model’s learning capacity.
Machine Learning & Deep Learning in Regularization
Let’s compare the results between Machine Learning and Deep Learning.
Effectiveness of Regularization: Both in machine learning and deep learning contexts, appropriate regularization helps mitigate overfitting, but excessive regularization leads to underfitting. The optimal regularization strength varies, with deep learning models potentially requiring a more nuanced balance due to their higher complexity.
Performance: The best-performing machine learning model (L2 with C=0.01, 89% accuracy) and the best-performing deep learning model (L1=0.01, L2=0.001, 88.5% accuracy) achieve comparable accuracies, demonstrating that both approaches can be effectively regularized to achieve high performance on this dataset.
Regularization Strategy: L2 regularization appears to be more effective and less sensitive to the choice of C in logistic regression models, while a combination of L1 and L2 regularization provides the best result in deep learning, offering a balance between feature selection and weight penalization.
The choice and strength of regularization should be carefully tuned to balance learning complexity with the risk of overfitting or underfitting.
Throughout this exploration, we’ve demystified regularization, showing its role in preventing overfitting and ensuring our models generalize well to unseen data.
Applying regularization techniques will bring you closer to proficiency in machine learning and deep learning, solidifying your data scientist toolset.
Go into the data projects and try regularizing your data in different scenarios, such as Delivery Duration Prediction. We used both Machine Learning and Deep Learning models in this data project. However, in the end, we also mentioned that there might be room for improvement. So why don’t you try regularization over there and see if it helps?
Nate Rosidi is a data scientist and in product strategy. He’s also an adjunct professor teaching analytics, and is the founder of StrataScratch, a platform helping data scientists prepare for their interviews with real interview questions from top companies. Connect with him on Twitter: StrataScratch or LinkedIn.

